Format Tips and Tricks 1
The ‘Invisible’ elements in Word are often there lurking to upset all your best made plans. By the ‘invisible’, I mean the returns you use to take you to the next page when you want just that one poem per page; the tabs you hit so you can position the text just where you want it on the page; and the end returns and spaces you bring across from material copied from a website or email. The latter can create so much havoc that you often can feel that you have no control of the text when it sits in a Word document. Click on the ¶ (pilcrow) in the Paragraph section under the Home tab and you will see all the non-printing characters that indicate all the invisible formatting actions you or some other person has performed throughout the document. All your returns will show as pilcrows; tabs as a space with a small arrow in the centre; and every space as a dot between each word.
Material copied from websites and emails can seem rigidly narrow or wider than the margins allow, and often show with short lines before other full-length lines. Displaying the formatting will reveal numerous returns (pilcrows) at the end of almost every line, mysterious little circles, tabs and so on. It is often better to retype in the material than to painstakingly remove the numerous little circles, returns and tabs. If pictures were embedded in the original online material, they may not transfer with the text, and huge gaps in the text can be created that are difficult to remove. Pictures might transfer okay, but then fail to cooperate in positioning them or deleting them without creating more problems. Besides possibly breaching the copyright of the author of the website material, it is better to simply copy the specific website address by highlighting it and pressing Ctrl+C, and pasting the link in your document if you need to do so for some reason.
However, I only mentioned copying from websites and emails as an example of the problems faced in dealing with invisible formatting elements. Most novices can create enough problems themselves when they create a document with more than one page. I was going to explore the do’s and don’ts of formatting, but it is probably easier to show you the best way to do things right off the bat.
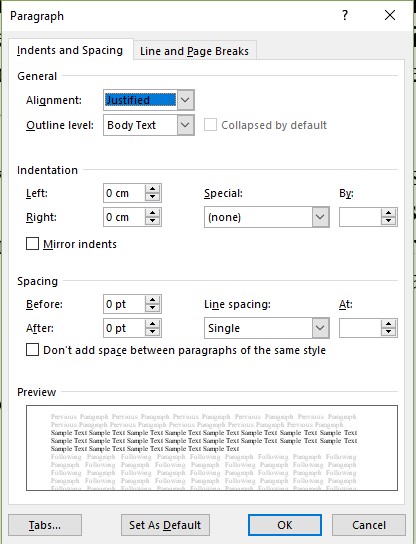
Whatever document you are working on, whether it is a long letter to a friend, a report, or a creative work such as a series of poems or short stories, you want to decide how the text is presented. You may remember that the Paragraph options panel is under the Home tab. If you go to the menu for all the paragraph options (click the little arrow to the right of the Paragraph panel), it will open a window which looks like the one shown here. It will open under its tab of Indents and Spacing. At the top is the General section with menus for Alignment and Outline level. The Alignment menu allows you to choose for the text to be neatly aligned to the left, right, centre, or justified (neatly aligned to both margins).
The second section is for Indentation. Here you can – instead of applying a lot of tabs across the page – indent your text (e.g. a poem) further from the left and right margins. However, it is probably easier to do this using the Ruler as I will explain when I discuss the View tab.
The other important menu here is the one called Special. It has two options – First line, and Hanging indents. If you want the first line of each paragraph to be indented, choose this option. You must then decide the width of the indent, which may suggest a default indent of 1.27cm. The Hanging indent will indent the body of the paragraph, leaving the first line hanging over the remainder of the text in that paragraph. Choosing either of these options will mean that every time you type a new paragraph, the choice you made will automatically apply. However, if you have already typed in several paragraphs, the options will only apply from where you have your cursor, and not previously, unless you have highlighted all the text.
Remember, even if you have a completed document, and you want to change its formats, then it is never too late, you can change it very quickly using the Paragraph options window with all the relevant text highlighted.
The next section under the Paragraph options window is the Spacing. Here you can determine line spacing and spacing between paragraphs. The Before and After menus refer to how much space you want before a paragraph, and after the end of a paragraph on top of the regular line spacing (single, double, etc.) There is even a box you can tick if you don’t want the extra spaces between paragraphs of the same style. The spacing between paragraphs is expressed in points, from zero through increments to whatever spacing level that you want. Note that if you apply spacing for both before and after paragraphs, that the addition of the two will apply between most paragraphs. The line spacing gives you a choice of options, including extra spacing points under the ‘At’ option (something I would not worry too much about). A Preview window at the bottom of Paragraph options will show you how your choices will affect the spacing of the text.
TABS
You may see there is another button at the bottom of the Paragraph options window marked as Tabs. Sometimes, a document may be littered with tab marks which display as little ‘L’ shaped markers in the ruler. You may want to remove them for one reason or another and going to this Tabs window can save you a lot of work. For example, preparing a document to be converted to an ebook must first have all these nuisance tab marks removed. Under the Tabs options, you can press Clear All to remove all the tabs from an entire document in one go. You can also use this window to apply tab stops where you want them. Remember, any options you choose under any of these windows will only apply if you press the ‘Okay’ button. ‘Cancel’ or the ‘X’ at the top right of the window will cancel any actions you may have selected.
If you need help with editing or proofreading, check out my website at https://paulvanderloos.wixsite.com/editor
